こんにちは、ナレコム前川です。
今回は、Amazon Sumerian の公式チュートリアルの
DOM Event Listeners を進めていきたいと思います。
今回は、ユーザーのクリックやドラッグ、タッチに応答するインタラクティブなシーンを作成するのに役立ちます。
JavaScript のイベントリスナーを使用することによってユーザーの入力を操作することができます。
ここでは、ユーザーがマウスを使用してエンティティを回転させるためのスクリプトを作成します。
それでは、進めていきましょう。
1. シーンの作成
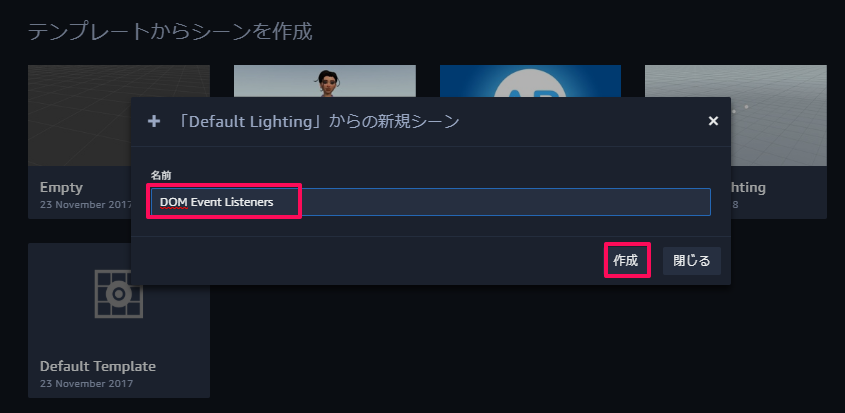
① ダッシュボードからDefault Lightingを選択。
② シーン名を「DOM Event Listeners」に設定し、作成。
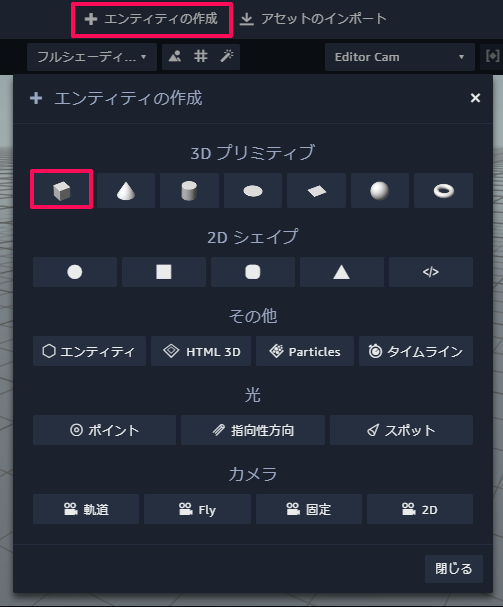
③ Create Entity から Box を追加。
※ 3D の別のエンティティ(例えば、球とか)でも構いません。
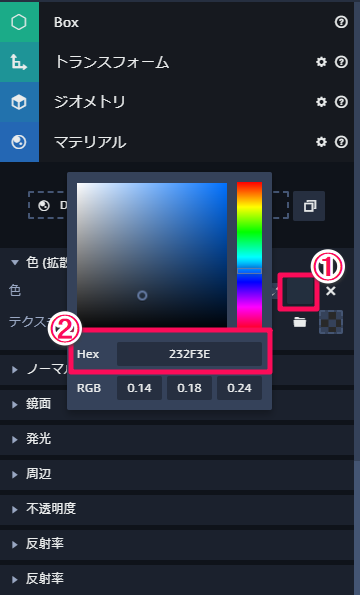
④ Box の色を変更。(Hex の 232F3E に設定しました。)
⑤ Box に Script Component を追加し、Custom を追加。
⑥ スクリプト名を「Spinner」に設定。

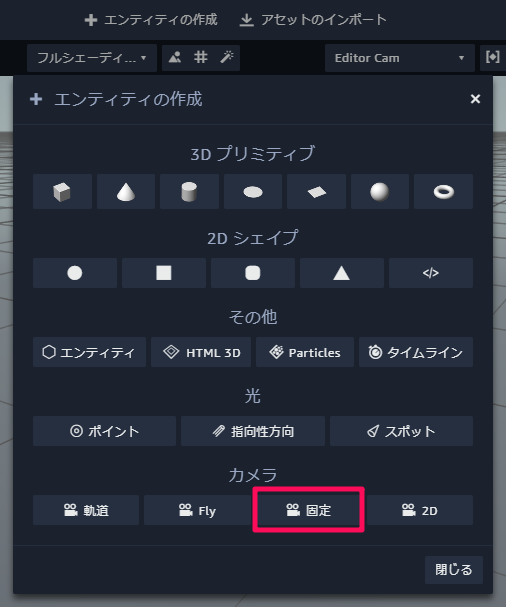
⑦ Create Entity から Fixed Cam を追加。
⑧ Fixed Cam を選択し、Main Camera と Follow Editor Camera にチェックを入れる。
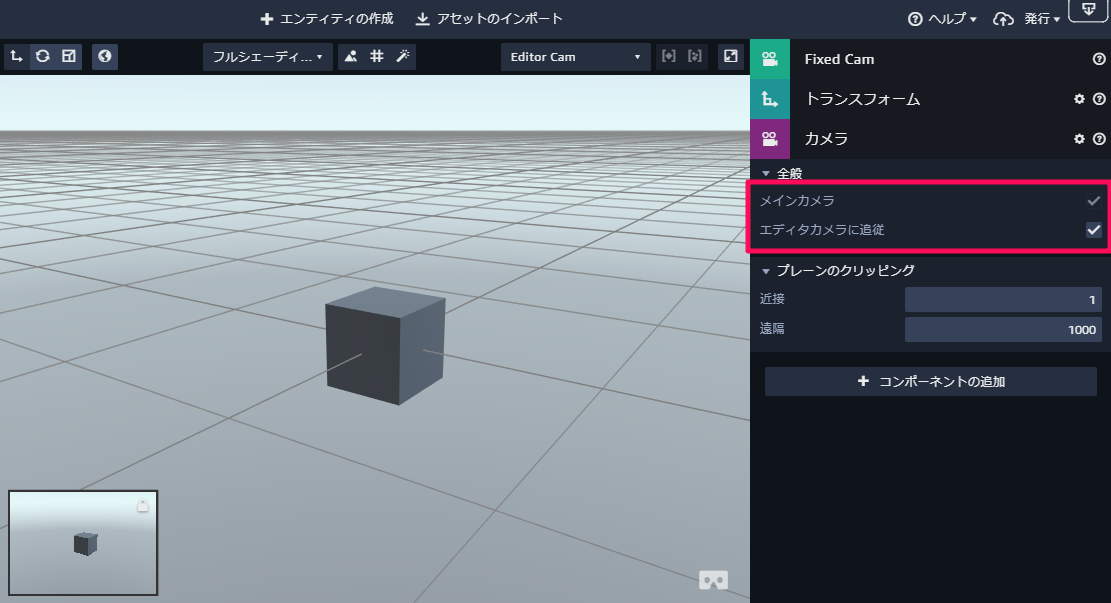
これで、シーンの設定は終わりです。
2. JavaScript Event Listeners を理解する
イベントハンドラに要素(例えば、div とか)や document, window をアタッチすることができます。
以下のコードは、mousedown イベントリスナーを window オブジェクトに追加する方法を示しています。
|
1 2 3 |
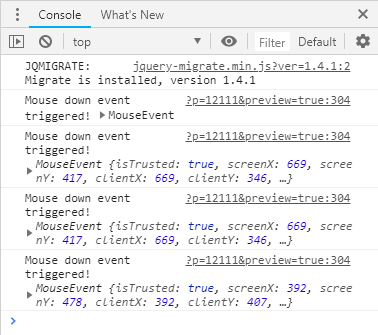
window.addEventListener('mousedown', function(evt) { console.log('Mouse down event triggered!', evt); }); |
evt は、イベントが発生した座標などのプロパティを保持します。
それでは、evt についてコンソールを開いて確認してみてください。
マウスをクリックするとマウスの位置が表示されます。
3. Event Listeners の追加と削除
イベントリスナーを使用する上で気にかけることがいくつかあります。
まず、setup 関数については、イベントリスナーを追加するのに最適な関数です。
しかし、追加したリスナーを cleanup 関数で削除する必要があります。
削除するにあたって、格納されたリスナーのハンドルが必要となります。
また、イベントリスナーのカスタマイズや作業を容易にするために、優れたスクリプト構造を持つことが大切です。
それでは、実際に編集して実行していきましょう。
|
1 2 3 4 5 6 7 8 9 10 11 12 13 14 15 16 17 18 19 20 21 22 23 |
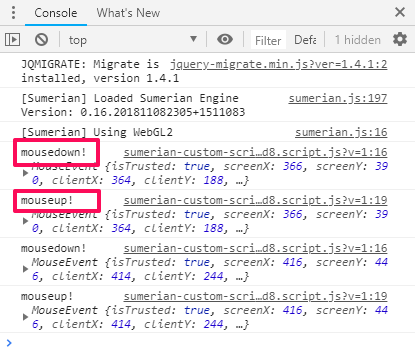
var setup = function(args, ctx) { ctx.evtListeners = { mousedown: function(evt) { console.log('mousedown!', evt); }, mouseup: function(evt) { console.log('mouseup!', evt); } }; for (var handle in ctx.evtListeners) { // The canvas element can be reached through ctx.domElement ctx.domElement.addEventListener(handle, ctx.evtListeners[handle]); } }; var cleanup = function(args, ctx) { for (var handle in ctx.evtListeners) { ctx.domElement.removeEventListener(handle, ctx.evtListeners[handle]); } }; |
上記のプログラムをスクリプトに追加・保存し、シーンを実行してみてください。
コンソールを確認すると、以下のように表示されます。
3. 回転に速度をつける
ここでは、mousedown, mouseup, mousemove のイベントを組み合わせたスクリプトを作成していきたいと思います。
① 以下のスクリプトを setup 関数の一番上に書く。
|
1 |
ctx.dragging=false;ctx.velocity=0;ctx.lastX=0;ctx.currentX=0; |
② 2 つのパラメータを設定するため、以下のコードを追加する。
|
1 2 3 4 5 6 7 8 9 10 11 12 13 14 15 16 17 18 19 20 |
var parameters = [ { key: 'sensitivity', name: 'Sensitivity', type: 'float', control: 'slider', min: 0.01, max: 1.00, default: 0.05 }, { key: 'damping', name: 'Damping', type: 'float', control: 'slider', min: 0, max: 1, default: 0.05 } ]; |
sensitivity は、マウスのドラッグ距離に関連して回転速度を制御します。
damping は、Box が永遠に回転しないようにするものです。
③ 実際の動作を制御する関数を追加する。
|
1 2 3 4 5 6 7 8 9 10 11 12 13 14 15 16 17 18 19 20 21 22 23 24 25 26 27 |
var startDrag = function(ctx, x) { ctx.dragging = true; ctx.currentX = x; }; var stopDrag = function(ctx) { ctx.dragging = false; }; var drag = function(ctx, x) { if (ctx.dragging) { // Record the x position from the last update ctx.lastX = ctx.currentX; // Update the current x position ctx.currentX = x; // Use the dragged distance since last update to add velocity ctx.velocity += ctx.currentX - ctx.lastX; } }; var update = function(args, ctx) { // Use the accumulated velocity to add rotation around the y axis. // Apply the elapsed time to to be frame rate independent. ctx.entity.addRotation(0, args.sensitivity * ctx.velocity * ctx.world.tpf, 0); // Apply damping ctx.velocity *= (1-args.damping); }; |
④ setup 関数のイベントリスナーを以下のようにする。
|
1 2 3 4 5 6 7 8 9 10 11 12 13 14 15 16 17 18 19 20 21 22 23 |
ctx.evtListeners = { mousedown: function(evt) { startDrag(ctx, evt.clientX); }, mouseup: function() { stopDrag(ctx); }, mouseout: function() { stopDrag(ctx); }, mousemove: function(evt) { drag(ctx, evt.clientX); }, touchstart: function(evt) { startDrag(ctx, evt.touches[0].clientX); }, touchend: function() { stopDrag(ctx); }, touchmove: function(evt) { drag(ctx, evt.touches[0].clientX); } }; |
これで、スクリプトの作成は完了です。
実行して確認してみてください。
もしうまくいかない場合は、以下のコードと置き換えてください。
以下は、完成版のスクリプトです。
|
1 2 3 4 5 6 7 8 9 10 11 12 13 14 15 16 17 18 19 20 21 22 23 24 25 26 27 28 29 30 31 32 33 34 35 36 37 38 39 40 41 42 43 44 45 46 47 48 49 50 51 52 53 54 55 56 57 58 59 60 61 62 63 64 65 66 |
var setup = function(args, ctx) { ctx.dragging = false; ctx.velocity = 0; ctx.lastX = 0; ctx.currentX = 0; ctx.evtListeners = { mousedown: function(evt) { startDrag(ctx, evt.clientX); }, mouseup: function() { stopDrag(ctx); }, mouseout: function() { stopDrag(ctx); }, mousemove: function(evt) { drag(ctx, evt.clientX); }, touchstart: function(evt) { startDrag(ctx, evt.touches[0].clientX); }, touchend: function() { stopDrag(ctx); }, touchmove: function(evt) { drag(ctx, evt.touches[0].clientX);} }; for (var l in ctx.evtListeners) { ctx.domElement.addEventListener(l, ctx.evtListeners[l]); } }; var cleanup = function(args, ctx) { for (var l in ctx.evtListeners) { ctx.domElement.removeEventListener(l, ctx.evtListeners[l]); } }; var startDrag = function(ctx, x) { ctx.dragging = true; ctx.currentX = x; }; var stopDrag = function(ctx) { ctx.dragging = false; }; var drag = function(ctx, x) { if (ctx.dragging) { ctx.lastX = ctx.currentX; ctx.currentX = x; ctx.velocity += ctx.currentX - ctx.lastX; } }; var update = function(args, ctx) { ctx.entity.addRotation(0, args.sensitivity * ctx.velocity * ctx.world.tpf, 0); ctx.velocity *= (1-args.damping); }; var parameters = [{ key: 'sensitivity', name: 'Sensitivity', type: 'float', control: 'slider', min: 0.01, max: 1.00, default: 0.05 },{ key: 'damping', name: 'Damping', type: 'float', control: 'slider', min: 0, max: 1, default: 0.05 }]; |
今回のチュートリアルは以上です。
お疲れ様でした。
